Z値のあるスプライト描画(Sprite)
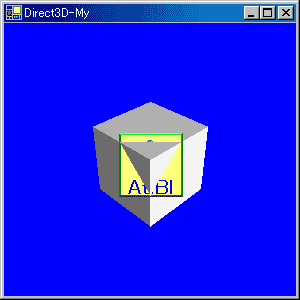
スプライトでは描画するときにZ値を指定することが出来ます。この機能を利用することで、3Dオブジェクトの後ろにテクスチャを描画することも出来ます。
ソースコード
今回は「ライト」「カメラ」「マテリアル」「スプライト」「Zバッファ」「メッシュ」を利用します。ある意味今までの集大成です。
using System;
using System.Drawing;
using System.Windows.Forms;
using Microsoft.DirectX;
using Microsoft.DirectX.Direct3D;

namespace Project2
{
    /// <summary>
    /// md3d2 の概要の説明です。
    /// </summary>
    public class md3d2:Form
    {
        /// <summary>
        /// テクスチャの座標
        /// </summary>
        private Vector3 texturePos =new Vector3(0,0,0);


        public md3d2():base()
        {
            //最小サイズを設定
            this.MinimumSize=new Size(80,60);

            this.Size = new Size(300,300);

            this.Text ="Direct3D-My";
            this.KeyDown+=new KeyEventHandler(md3d2_KeyDown);
        }

        private Device device_;
        private PresentParameters presentParam_;

        /// <summary>
        /// スプライトを行うためのもの
        /// </summary>
        private Sprite sprite_;

        /// <summary>
        /// Direct3Dの初期化を行います。
        /// </summary>
        /// <returns>初期化が成功したかどうか</returns>
        public bool DXInitialize()
        {
            try
            {
                //プレゼンテーションパラメータを作成
                presentParam_ = new PresentParameters();

                //ウィンドウモード
                presentParam_.Windowed =true;

                //スワップエフェクトを設定。
                presentParam_.SwapEffect = SwapEffect.Discard;
                presentParam_.AutoDepthStencilFormat = DepthFormat.D16;
                presentParam_.EnableAutoDepthStencil =true;

                //デバイスを作成
                device_ = new Device(0,DeviceType.Hardware,this
                    ,CreateFlags.HardwareVertexProcessing,presentParam_);


                createTexture();
                createMesh();

                sprite_ = new Sprite(device_);


                //初期化成功
                return true;
            }
            catch
            {
                //初期化失敗
                return false;
            }

        }


        /// <summary>
        /// テクスチャ
        /// </summary>
        private Texture spriteTexture_;

        /// <summary>
        ///
        /// </summary>
        private void createTexture()
        {
            string openTexture
                = @"I:\temp\Atbl.png";
            //ここを書き換える。絶対パスの方が扱いやすいです。

            spriteTexture_ = TextureLoader.FromFile(device_ ,openTexture);
        }

        private Mesh boxMesh_;

        private void createMesh()
        {
            boxMesh_ = Mesh.Box(device_,2,2,2);
        }


        public void Render()
        {
            if(device_==null)return;
            if(this.WindowState ==FormWindowState.Minimized)return;

            device_.Clear(ClearFlags.Target|ClearFlags.ZBuffer,Color.Blue,1.0f,0);

            //カメラの設定を行う
            device_.Transform.View = Matrix.LookAtLH(
                new Vector3( 5.0f, 5.0f, 5.0f ),
                new Vector3( 0.0f, 0.0f, 0.0f ),
                new Vector3( 0.0f, 1.0f, 0.0f ) );
            device_.Transform.Projection =
                Matrix.PerspectiveFovLH((float)Math.PI / 4,
                (float)this.ClientSize.Width / (float)this.ClientSize.Height,
                5.0f, 15.0f);

            //device_.RenderState.Lighting =false;

            //ライトの設定
            device_.Lights[0].Direction =Vector3.Normalize(new Vector3(-1,-2,-3));
            device_.Lights[0].Type = LightType.Directional;

            device_.Lights[0].Diffuse = Color.FromArgb(255,255,255);
            device_.Lights[0].Ambient = Color.FromArgb(40,40,40);

            device_.Lights[0].Enabled =true;
            device_.Lights[0].Update();


            //マテリアルの設定
            Material mat =new Material();
            mat.AmbientColor = new ColorValue(1.0f,1.0f,1.0f);
            mat.DiffuseColor = new ColorValue(1.0f,1.0f,1.0f);
            device_.Material = mat;


            device_.BeginScene();

            boxMesh_.DrawSubset(0);

            sprite_.Begin(SpriteFlags.None);

            sprite_.Draw(spriteTexture_,new Vector3(0,0,0),texturePos,Color.White.ToArgb());

            sprite_.End();

            device_.EndScene();

            try
            {
                //更新
                device_.Present();
            }
            catch(DeviceLostException)
            {
                resetDevice();
            }

        }

        /// <summary>
        /// デバイスのリセットを行う
        /// </summary>
        private void resetDevice()
        {
            int result;
            if(!device_.CheckCooperativeLevel(out result))
            {
                if(result ==(int)ResultCode.DeviceLost)
                {
                    //ちょっと待つ
                    System.Threading.Thread.Sleep(10);
                }
                else if(result ==(int)ResultCode.DeviceNotReset)
                {
                    device_.Reset(presentParam_);
                }
            }
        }

        private void md3d2_KeyDown(object sender, KeyEventArgs e)
        {
            switch(e.KeyCode)
            {
            case Keys.Down:
                if(e.Shift)
                {
                    texturePos.Z+=0.1f;
                    if(texturePos.Z >1)texturePos.Z = 1;
                }
                else
                {
                    texturePos.Y+=5;
                }
                break;
            case Keys.Up:
                if(e.Shift)
                {
                    texturePos.Z-=0.1f;
                    if(texturePos.Z < 0)texturePos.Z = 0;
                }
                else
                {
                    texturePos.Y-=5;
                }
                break;
            case Keys.Left:
                texturePos.X-=5;
                break;
            case Keys.Right:
                texturePos.X+=5;
                break;
            }
        }
    }

    /// <summary>
    /// エントリクラス
    /// </summary>
    class Program
    {
        public static void Main()
        {
            using(md3d2 dxform =new md3d2())
            {
                if(!dxform.DXInitialize())
                {
                    MessageBox.Show("Diret3Dの初期化に失敗しました。"
                        ,"初期化の失敗");
                    return;
                }
                dxform.Show();

                while(dxform.Created)
                {
                    dxform.Render();
                    Application.DoEvents();
                }
            }
        }
    }
}
長いですが、重要なところはごくわずかです。
操作方法
今回はテクスチャを動かせるようにしてみました。カーソルキーで上下左右に動かせます。「Shiftキー」を押しながら、上下のカーソルキーを押すと、テクスチャに設定したZ値が変化します。
描画
今回のスプライトは「Sprite.Draw2D」ではなく「Sprite.Draw」で描画します。
public void Draw(
    Texture srcTexture,
    Vector3 center,
    Vector3 position,
    int color
);
引数が「Vecter3」なのでZ値がありますね。
center
この値はあまりいじる必要がないと思います。とりあえず(0,0,0)にしておくと良いと思います。
position
いじるのは主にこちらです。(X,Y)はDraw2Dの時と同じくスクリーン系の座標に対応しています。そして最後のZは「0~1」の範囲で設定します。最終的にオブジェクトのZ値は「0~1」になりますが、その時の値に対応しています。
その他
今回は「KeyDown」イベントを使ってテクスチャの座標を動かしています。
ソースコードの長さの割に説明が短くなってしまいました。今回の描画方法は背景描画などに利用できるかもしれません。Z値を「1」に設定すれば一番後ろに描画できるので背景を描くことが出来ます。
ページの一番上へ
前のページへ 一覧に戻る 次のページへ
初版2006-4-15
(c) 2006,Atelier Blue (Rito)
- 質問から意見、誤字訂正まで気軽に連絡してください。
- こちらに掲示板も用意しています。「プログラム掲示板」
- リンクに関してはご自由にどうぞ。
- 書いてある情報については、特に断り書きがない限り自由に使ってください。そのまま転載しても、書き換えたりして再利用してもかまいません。